Importing Inventory Items
Before importing, make sure you read Before Importing - About UID
To just update pricing for your inventory items see Update Inventory Pricing
Note: This guide is for importing your inventory item list. If you want to import inventory stock levels see Import Stock
Step 1: Prepare the inventory item import file
1. Open Excel and create columns for the inventory items based off image below.

Name = Item Name **If you are syncing the items to QuickBooks, the character limit for this field is 30. If not syncing to QB, the limit is 40**
Number = Item Number
Description = Item Description
Cost = Cost
Retail1 = Price
AddToCustEQ = If TRUE then box is checked, if FALSE not checked
IsActive = If TRUE then box is checked, if FALSE not checked
DefaultLocation = Default Location
DefaultLocationUID = UID Associated with the location
Serialized = If TRUE then box is checked, if FALSE not checked
QBExport = Recommend 0 or False. If TRUE then Export to QB box is checked and the item will sync to QB, if FALSE not checked
QBInventory - OPTIONAL. If TRUE then As Inventory Item will be checked and will go to QB as inventory item, if FALSE not checked and go to QB as non-inventory item
TaxGroupName - OPTIONAL CANADA ONLY. Usually either GST or HST
2. Paste the inventory item name, number, description, cost & retail1 in the corresponding columns.
3. Choose if you want the items to be added to customer equipment by default, make it serialized, and exported to quickbooks.
4. Put TRUE in IsActive column
5. You will usually enter the default location as default. If you are using a different default location for the items, enter it there with the corresponding UID.
6. Save the excel file to your desktop.
Step 2: Add additional columns to import file if needed
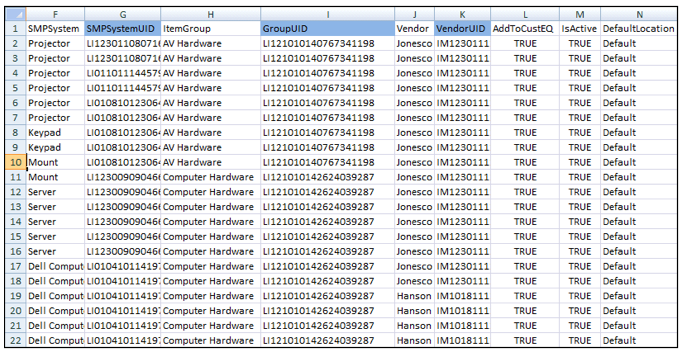
You may want to import in additional information for your inventory items such as default vendor, system type or group code. Below are some common columns you may want to add. You will need to export the UID out of SME to import into a drop down or associate the inventory item with another record, like vendor.

Below is an example of part of an import file including the SMPSystem, ItemGroup, and Vendor along with their UID.

Step 3: Import a test
As always when importing, import first a small sample of your whole spreadsheet including the column headers. Check your import before importing the whole spreadsheet.
1. Copy the first few rows of your spreadsheet including the column header and paste into a new spreadsheet. Save to your desktop.
2. Go to Utilities > Utilities > Import Data and click Run It. The Data Import window opens
3. In the Source Filename field, browse for your test import file you saved in step1. (when browsing for your file, make sure you are search “All Files”)
4. In the Destination table drop down, select Inventory
5. You will see a preview of your spreadsheet in the grid
6. Click Start.
7. You will be asked if you want to backup your data. You should be regularly backing up your data, so usually people click No to skip the backup.
8. When the import is complete you can close the Data Import window and look in the Inventory module for the items you imported. Check all of the fields to make sure it imported fine.
Step 4: Import the rest of spreadsheet
If your test import worked fine, then you can import the rest of the inventory items. It is a good idea to break up your items into spreadsheets with around 1000 items.
1. Delete the items off your spreadsheet that you imported in your testing. If you don’t delete them, they will be imported again.
2. Save your spreadsheet to your desktop.
3. Go to Utilities > Utilities > Import Data and click Run It. The Data Import window opens
4. In the Source Filename field, browse for your import file. (when browsing for your file, make sure you are search “All Files”)
5. In the Destination table drop down, select Inventory
6. You will see a preview of your spreadsheet in the grid
7. Click Start.
8. You will be asked if you want to backup your data. You should be regularly backing up your data, so usually people click No to skip the backup.
9. When the import is complete you can close the Data Import window and look in the Inventory module for the items you imported.