Difference between revisions of "SMO Settings"
(change h5sw to high5software for links) |
|||
| (10 intermediate revisions by the same user not shown) | |||
| Line 1: | Line 1: | ||
| − | Back to [[SMO]] | + | Back to [[SMO]] main page |
| − | =Overview= | + | =Settings Overview= |
The initial user that signs up a company on SMO is considered the company admin and can configure all the settings for the company. | The initial user that signs up a company on SMO is considered the company admin and can configure all the settings for the company. | ||
| Line 9: | Line 9: | ||
== Accounting Sync with QuickBooks Online == | == Accounting Sync with QuickBooks Online == | ||
| − | https:// | + | https://high5software.herokuapp.com/settings/accounting |
QuickBooks desktop syncing will be provided in the future | QuickBooks desktop syncing will be provided in the future | ||
* Connect to QuickBooks Online (QBO): Select this button to connect to your QuickBooks file. | * Connect to QuickBooks Online (QBO): Select this button to connect to your QuickBooks file. | ||
| Line 19: | Line 19: | ||
== Roles: Setup Access Rights == | == Roles: Setup Access Rights == | ||
It's best to setup Roles before setting up users | It's best to setup Roles before setting up users | ||
| − | https:// | + | https://high5software.herokuapp.com/roles |
* Add New Role: To configure a new role with rights access rights for Customer, Jobs, Jobtimes, Contacts, Reports, and Settings/Admin | * Add New Role: To configure a new role with rights access rights for Customer, Jobs, Jobtimes, Contacts, Reports, and Settings/Admin | ||
* Access Rights for Modules: | * Access Rights for Modules: | ||
| Line 31: | Line 31: | ||
== Users: Configure SMO Users == | == Users: Configure SMO Users == | ||
| − | https:// | + | https://high5software.herokuapp.com/users |
Note: You should first sync QBO Employees before setting up users. | Note: You should first sync QBO Employees before setting up users. | ||
* Add New User: To configure the users. Note: Best to first sync employees with QB in the Accounting section. | * Add New User: To configure the users. Note: Best to first sync employees with QB in the Accounting section. | ||
| Line 53: | Line 53: | ||
*'''Text Box''' | *'''Text Box''' | ||
**The text box allows the user to enter a simple textual note | **The text box allows the user to enter a simple textual note | ||
| + | |||
| + | Note: In "Settings" the user is simply creating a title for the text box. When a custom field is accessed from "Jobs" or "Customers" the user then fills in the blank text box with the given title. | ||
*'''Dropdown List''' | *'''Dropdown List''' | ||
| Line 59: | Line 61: | ||
*'''Calendar''' | *'''Calendar''' | ||
**Creates a text box accompanied with a pop-up calendar which can be used to find and enter a date into the text box | **Creates a text box accompanied with a pop-up calendar which can be used to find and enter a date into the text box | ||
| + | |||
| + | Note:In "Settings" the user is simply creating a space which will later be filled by a calendar dialog box. When a custom field is accessed from "Jobs" or "Customers" the user then fills in the space by interacting with the pop up calendar dialog. | ||
| + | |||
*'''Legend''' | *'''Legend''' | ||
| Line 65: | Line 70: | ||
*'''Table''' | *'''Table''' | ||
**User can create a table with column/row headings and textual/numerical information in the body of the table | **User can create a table with column/row headings and textual/numerical information in the body of the table | ||
| + | |||
| + | Note: In "Settings" the user is simply creating the column headings for the table. When a custom field is accessed from "Jobs" or "Customers" the user then fills in the remainder of the table. | ||
| + | |||
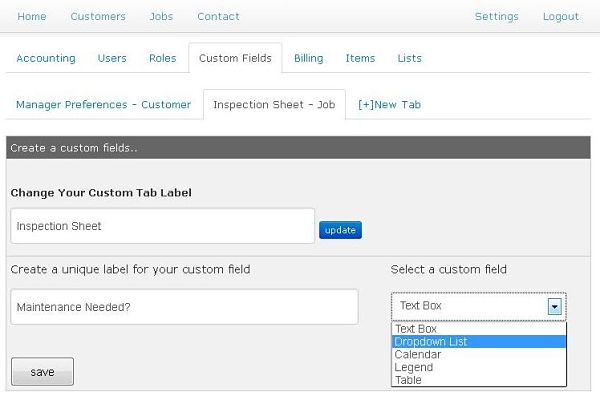
| + | [[File:SMOCustomFields1Printscreen.jpg|frame|none|Creating a custom field sheet under "Settings"]] | ||
| + | |||
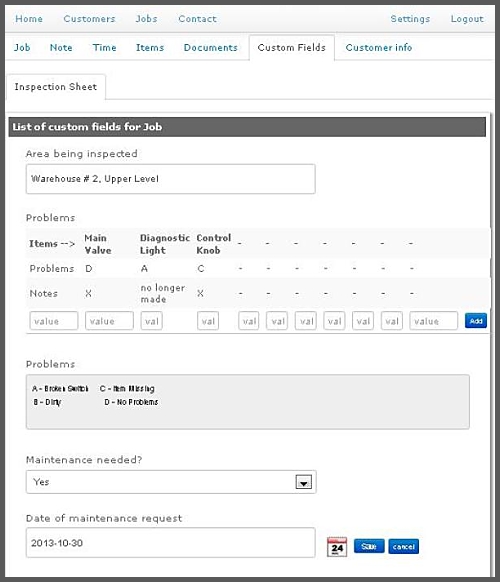
| + | [[File:SMOCustomFields2Printscreen.jpg|frame|none|Filling in a custom field sheet for a job]] | ||
== Billing: Billing for SMO service == | == Billing: Billing for SMO service == | ||
| Line 70: | Line 81: | ||
== Items: == | == Items: == | ||
| + | Displays the items that you have synced from QuickBooks to SMO for use in creating work orders and jobs. In order to sync items, follow the procedure below: | ||
| + | |||
| + | SMO Items are always synced from QuickBooks or QuickBooks Online. | ||
| + | SMO will not provide a way to create items because these should be created in QB and synced into SMO. | ||
| + | |||
| + | # First create your items in QB or QBO | ||
| + | # Go to Settings>Accounting>Sync Items Now | ||
| + | # This will sync all QB items into SMO so you can use inventory, non-inventory, and service items on jobs in SMO | ||
== Business Type == | == Business Type == | ||
Edit, add or delete types of businesses to label your customers with (government, residential, commercial, etc.) | Edit, add or delete types of businesses to label your customers with (government, residential, commercial, etc.) | ||
Latest revision as of 16:17, 27 May 2014
Back to SMO main page
Settings Overview
The initial user that signs up a company on SMO is considered the company admin and can configure all the settings for the company.
The setting consist of the following, Note that all the url links require company signup and login:
Actions
Accounting Sync with QuickBooks Online
https://high5software.herokuapp.com/settings/accounting QuickBooks desktop syncing will be provided in the future
- Connect to QuickBooks Online (QBO): Select this button to connect to your QuickBooks file.
- Sync Customers Now: This will bring all customers from QBO to SMO
- Sync Items Now: Sync all the QBO items including products and services.
- Sync Employees Now: Sync all employees into SMO so that you can configure SMO access and rights in the settings>users
- Sync Vendors Now: Sync all the vendors so you can setup subcontractors for work orders and SMO access.
Roles: Setup Access Rights
It's best to setup Roles before setting up users https://high5software.herokuapp.com/roles
- Add New Role: To configure a new role with rights access rights for Customer, Jobs, Jobtimes, Contacts, Reports, and Settings/Admin
- Access Rights for Modules:
- All: Provides full read and write access to the module
- Read-Only: Also users to read the module, but not edit or add records.
- Add/Read: Allows user to add new records and read existing records, but not edit existing records.
- None: No access
- Access Rights for Reports:
- With-Pricing: Allows reports with pricing
- Without-Pricing: Allows reports without pricing.
Users: Configure SMO Users
https://high5software.herokuapp.com/users Note: You should first sync QBO Employees before setting up users.
- Add New User: To configure the users. Note: Best to first sync employees with QB in the Accounting section.
- Role: Set the access rights role for the user
- Name: User name, usually First Last
- Accounting Type:
- Employee: To setup technician employees and other users to access the system
- Vendor: To setup a subcontractor that you would assign work orders to.
- Customer: To allow customers to access their jobs/work orders and history (future)
- Accounting Name: This is the name from QBO or QB
- Email: Email of the user and also used to login to SMO
- SMO User: Check this if you want the users to access SMO and they will get an invite email. Note: SMO users are charged on a per user charge.
- Language: Type in english. Other languages will be supported in the future. If you want a specific language or you want to have unique names in SMO, please contact smo@h5sw.com and we can provide a label file for you to customize all the labels.
- Time Zone: The primary time zone for the user.
- Edit User: Select edit on a user name to edit any of the user settings.
- Delete: Select delete to delete a user from SMO. Note, this will not affect QBO or QB.
Custom Fields: Setup company define fields
Custom fields allow the user to create infinitely variable jobs and customer descriptions/notes which can then be saved as templates. The custom fields fall into the following categories:
- Text Box
- The text box allows the user to enter a simple textual note
Note: In "Settings" the user is simply creating a title for the text box. When a custom field is accessed from "Jobs" or "Customers" the user then fills in the blank text box with the given title.
- Dropdown List
- Enables a drop down list which the user can populate with different options
- Calendar
- Creates a text box accompanied with a pop-up calendar which can be used to find and enter a date into the text box
Note:In "Settings" the user is simply creating a space which will later be filled by a calendar dialog box. When a custom field is accessed from "Jobs" or "Customers" the user then fills in the space by interacting with the pop up calendar dialog.
- Legend
- Allows the user to create a customized legend or block of text
- Table
- User can create a table with column/row headings and textual/numerical information in the body of the table
Note: In "Settings" the user is simply creating the column headings for the table. When a custom field is accessed from "Jobs" or "Customers" the user then fills in the remainder of the table.
Billing: Billing for SMO service
coming soon, no charge during this beta phase!
Items:
Displays the items that you have synced from QuickBooks to SMO for use in creating work orders and jobs. In order to sync items, follow the procedure below:
SMO Items are always synced from QuickBooks or QuickBooks Online. SMO will not provide a way to create items because these should be created in QB and synced into SMO.
- First create your items in QB or QBO
- Go to Settings>Accounting>Sync Items Now
- This will sync all QB items into SMO so you can use inventory, non-inventory, and service items on jobs in SMO
Business Type
Edit, add or delete types of businesses to label your customers with (government, residential, commercial, etc.)

