Invoicing
The invoice will show the billing address, the balance due, the type of invoice, the orders associated with the invoice, the due date and more.
Invoice Orientation
Below are the different sections of an invoice. Depending on the permissions your SME Administrator created, you may not have access to all the areas described below.
|
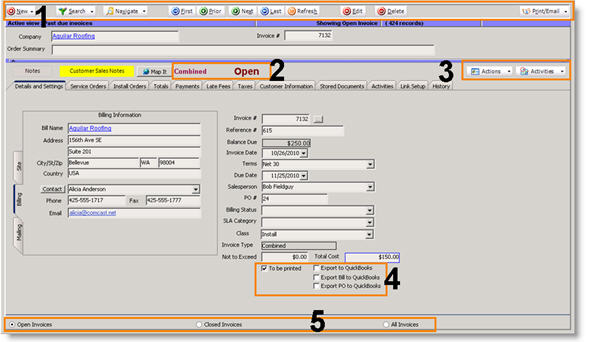
1 |
New – create new combined or itemized invoice. Search – search open, invoiced or all invoices. Navigate – jump to invoice by invoice number or recently viewed invoices. First, Prior, Next, Last – tab through invoices. Refresh – refresh window to see calculated fields update. Edit – click to make changes to an invoice. Delete – click to delete the invoice (permissions needed) Print/Email – print or email the invoice. The printed invoices can be customized in the Reports module.
|
|
2
|
Invoice Status – Open or Closed.
|
|
3 |
Actions – Rollback invoice, apply deposit, post credit and more. Activities – set activities for the invoice (remind yourself or others to take action on the invoice)
|
|
4 |
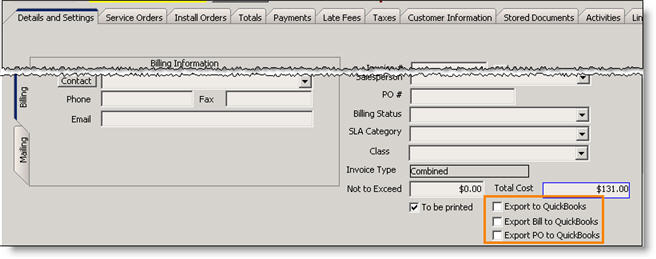
To be printed – if checked the invoice is added to batch print. After the batch print is processed, you have the option to clear out all the “to be printed” flags. If syncing SME with QuickBooks, you will setup what will sync by default. Based on those settings, these check boxes will be automatically checked. Export to QuickBooks – If checked, the invoice hasn’t synced with QuickBooks yet. It will transfer on the next sync and the checkbox will be unchecked once synced. Export Bill to QuickBooks – If checked, the bill for the subcontractor on the invoice hasn’t synced with QuickBooks yet. On the next sync, the bill for the subcontractor will be added to QuickBooks. Export PO to QuickBooks - If checked, the purchase order for the subcontractor on the invoice hasn’t synced with QuickBooks yet. On the next sync, the PO for the subcontractor will be added to QuickBooks. |
|
5 |
Select a filter to view Open, Closed or All invoices then use the navigation to tab through the filtered view.
|
Details and Settings Tab
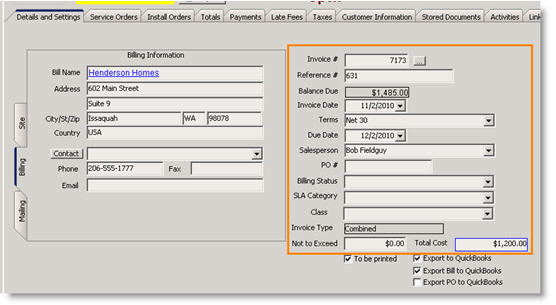
Invoice # - invoice number is generated based on the Next Invoice # in the Setup module.
Reference # - The order number the invoice was generated for.
Balance due- Calculated field showing the balance due on the invoice.
Invoice Date – Automatically populated based on the date the invoice was generated.
Terms – Invoice terms for that customer.
Due Date – Due date based on the invoice date and the terms.
PO# - If the order being invoiced has a PO number, the PO number will carry over to this field.
Billing Status– If you are syncing SME with QuickBooks, the billing status will be imported from QuickBooks. You can use this field to void an invoice, or click Actions > Void Invoice. Make sure you uncheck Export to QuickBooks so SQLink doesn’t try to sync the voided invoice.
Invoice Type – This field is not editable and shows the type of invoice (combined, itemized, partial, fixed, dollar amount, percent)
Types of Invoices
When creating a service or install order, select the Invoice Type. The type you select will change how the order is invoiced. Watch the video or read the description below.
<videoflash>b4ETBOoSBkU</videoflash>
Combined
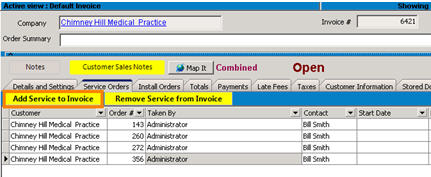
This converts the entire order to a combined invoice. This is a good option for good tracking because all the details are in the order rather than replicated on the invoice. Below is a screenshot of a combined invoice. When you create a combined invoice, you cannot edit the individual items on the invoice. You can combine multiple closed orders into one combined invoice.
To add additional service and install orders to a combined invoice:
1. Select the Service Orders or Install Orders tab.
2. Click Add Service to Invoice or Add Install to Invoice.
3.The window that opens will display all of the open and closed orders with the invoice type of combined for that billing company. Double click on the order you want to add to the invoice.
4. You will receive this message: “The order has been fully invoiced. Close it?” Click Yes to close the order.
5. The order will be listed on the Service Orders or Install Orders tab.
Itemized
Converting an order to an Itemized Invoice will duplicate all the items on the invoice for further editing, providing more flexibility in changing the invoice after it’s created. Below is a screenshot of an itemized invoice. Notice all the tabs from the order are available in the invoice.
Partial
Selecting the invoice type of Partial allows you to select individual items on the order to include on the invoice. Generate multiple invoices for the order until all items on the order are invoiced.
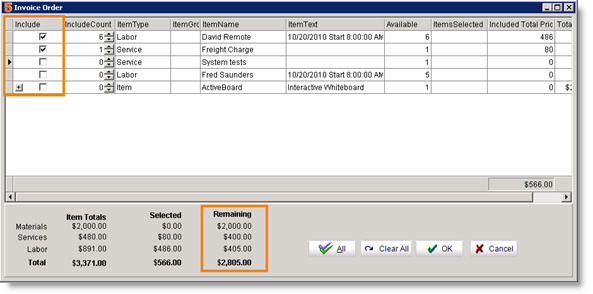
When generating a partial invoice for an order, the Invoice Order window will open (image below). Here you can select which items you want to include in the invoice. At the bottom of the window, you will see remaining total to be invoiced.
- Click Clear All.
- For Service and Labor Items, check in the Include column to include the item on the invoice.
If you are select material to include on the partial invoice, you will need to expand the material line to select which material you want to include on the invoice.
- Click on the material line you want to include on the invoice (1 in image below).
- Check in the Include column (2).
- Make sure the Inc Count column has the right quantity you want to include on the invoice (3).
- Click OK.
Fixed Total
If you choose the invoice type of Fixed Total on an order, you can enter a fixed amount for material, labor and services. When you choose Fixed Total invoice type, SME adds an additional tab on the order called Fixed Rates shown in the image below. You enter in the fixed rates for labor, materials and services and the invoice generated will use this amount, not the itemized amount based on the labor, materials and services added to the order.
1. Create an order and on the Details and Settings tab select Invoice Type – Fixed Total.
2. Save the order and notice the Fixed Rates tab appears (image below).
3. Enter the fixed amount for labor, materials and services in the Fixed Amount column.
4. Add labor and materials to the order as you normally would. The Fixed Rates tab will show you your cost in the Item Cost column. Compare costs to your fixed rates by viewing the Item Profit column.
5. When you are ready to invoice the order, your customer will receive an invoice for the fixed amount set on the Fixed Rates tab.
Percent of Total
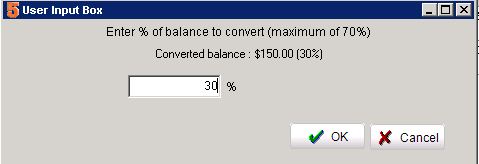
When generating an invoice for an order with % of Total Invoice Type, you will be prompted to enter the percent of the balance you want to convert.
Dollar Amount
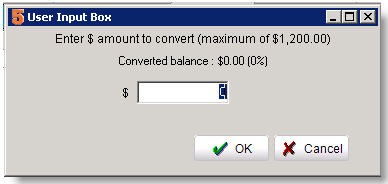
When generating an invoice for an order with $-Dollar Amount invoice type, you will be prompted to enter the dollar amount you want to convert to an invoice. SME will allow generation of multiple invoices based on the dollar amounts. It will keep track of how much has been converted towards the total.
Invoice a Percent of a Fixed Invoice
If you setup a fixed invoice and you are ready to invoice the order, a fixed invoice will invoice the total order. If you need to invoice a percentage of a fixed amount, you will need to change the type of invoice to a percent or partial invoice and change the way you enter the items on the order.
1. Create a service item in SME called Service fixed total
2. Create a material item in SME called Material fixed total
3. Create a technician in SME called Labor fixed total
Now start adding the fixed total amounts to the order on the Order Items tab:
4. Select the Order Items tab on the service or install order.
5. Click New Service and select the Service fixed total item. Enter the fixed service total in the Price field. Enter 0 in the Cost field. Click OK.
6. Click New Material and select the Material fixed total item. Enter the fixed material total in the Price field. Enter 0 in the Cost field. Click OK.
7. Click New Labor and select the Labor fixed total technician. Enter the fixed labor total in the Unit Price field and make sure Billable Qty is 1. Enter 0 in the Scheduled Qty and Unit Cost fields. Click OK.
When you add labor, materials and services to the order, make sure you do not fill out the price field. Only fill out the cost field for these items. The only items on the order that should have prices in them are the three fixed total placeholder items you added. The partial or percent of total invoices generated will be based on the total of the three.
Invoice an Order
To find the orders that are ready to be invoiced, you will need to search for all closed orders.
To find all closed orders:
1. Select the Service or Install module.
2. Click Search, select Search Closed Orders.
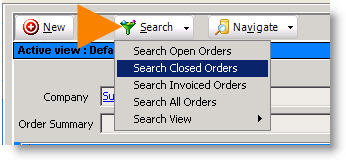
3. The Search Closed Orders window will open.
4. Double click on an order to open.
You can then use the same tools for searching closed orders as you can with searching open orders. (e.g. adding columns, adding filters)
Quick Invoice For orders with the invoice type of Full-Itemized or Combined, you can click Quick Invoice and an invoice is generated and the order status moves to “invoiced”. To see the invoice, go to Invoicing in the Receivables module.
Actions > Generate Invoice For any invoice type you can click Actions and select Generate Invoice. To see the invoice, go to Invoicing in the Receivables module.
Actions> Generate Final Invoice Use Generate Final invoice if you are doing a Dollar Amount, % of total, or partial invoice and you want to make sure the rest of the invoice is generated without having to get it exact. For example, if you did 33.3%, then 33.3%, then you would want to just generate final rather than figure out that you need to invoice 33.34% for the final.
**NOTE** If you are syncing SME with QuickBooks, the invoice will also be in QuickBooks after your next sync.
Video Showing Invoices Syncing to QuickBooks
If you are syncing SME with QuickBooks, watch the video below to see how the invoices created in SME sync to QuickBooks and how income is passed.
<videoflash>LWcmKN2GbnE</videoflash>
You will also want to understand how to setup the Default Export to QuickBooks Settings and review the SQLink section of the wiki.
Email or Print Invoice
Once the invoice is created it should be immediately sent to the customer.
- Go to the invoice.
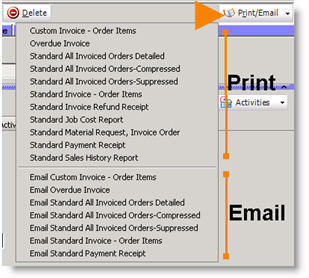
- Click Print/Email.
- In the menu, everything above the horizontal line is a report you can print. Select anything below the horizontal line to email the report to your customer.
A common invoiced used is the Standard Invoice – Order Items report.
To remove some of the reports from the Print/Email menu:
- To to Reports module > Customize Reports.
- Click Search > Search Standard.
- Double click on the report you want to remove from the menu.
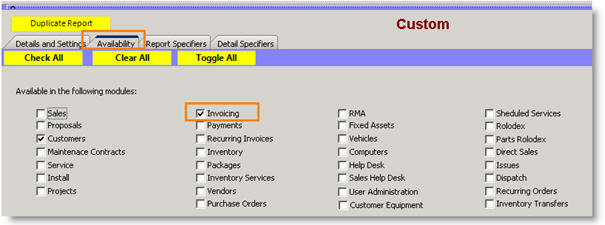
- Select the Availability tab.
- Uncheck Invoicing (circled below).
- Click Save.
Rollback Invoice and make changes to the order
Once you invoice an order you cannot change the order. To make changes to an order once it has been invoiced, you will need to rollback the invoice, make changes to the order, then re-invoice the order.
Rollback Invoice
1. Go to the invoice.
2. Click Actions > Rollback Invoice.
3. Click Yes to confirmation window. The order associated with the invoice will change from the status of 'Invoiced' back to 'Closed'.
NOTE: if you are syncing with QB and the invoice is in QB, make sure you go to QB and delete the invoice. Rolling it back in SME doesn't delete it out of QB.
Edit Order
Locate the service or install order and make the changes to the order. If you don't have permission to edit a closed order, have someone with permissions reopen the order or make the changes to the closed order for you.
Re-invoice the Order
1. Click Actions > Generate Invoice.
2. The order status will change to 'Invoiced' and an invoice is created.
Note: If you need to keep the same invoice number, instead of clicking Actions > Generate Invoice on the order, follow these steps:
- Write down the order number that needs to be re-invoices.
- Go to the correct customer record (not the DUP customer).
- Click Actions > New Combined Invoice. SME will jump to the new invoice.
- On the Details and Settings tab, locate the Invoice # field. Click
 to enter the invoice number you want to use. (If you don’t see this icon, you need to add the permission to initialize numbers to your user group settings)
- Select the Service Orders or Install Orders tab to select the order you need to invoice.
- Click Save.
Batch Print or Batch Email Invoices
<videoflash>puXESXZPvYE</videoflash>
If you want to use the Batch Print/Batch Email feature, you will want to set SME to set new invoices you create in either the Batch Print or Batch Email queue.
- Go to the Setup module > Company > Order section
- Click Edit
- Check either Set To Be Printed flag on New Invoices or Set To Be Emailed flag on New Invoices
- Click Save
Once you have your default options set, when you create a new invoice, the To Be Printed/ To Be Emailed flags will be checked and set up in your queue (shown below)

Note - If you are syncing SME with QuickBooks and you checked the option to Set To Be Emailed by default, if the customer doesn't have an email address, the invoice won't be able to sync to QuickBooks.
Void Invoice Click Action > Void Invoice to void the invoice. The billing status on the invoice changes to Voided. The invoice is closed and moves the order from invoiced to closed.
If you are syncing with QuickBooks, a voided invoice will not export to QuickBooks. Uncheck Export to QuickBooks (circled in image below) so SQLink won’t try to export the voided invoice and generate an error.
If you want the voided invoice in QuickBooks:
- Sync the invoice to QuickBooks.
- Void the invoice in QuickBooks.
- Void the invoice in SME.
Calculate Finance Charge
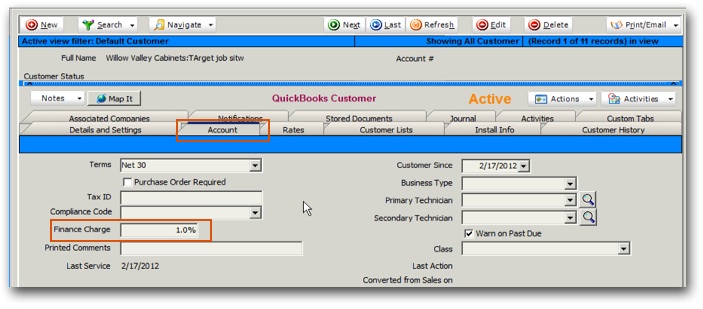
In order to apply a finance charge on an invoice, you need to enter a finance charge % on the customer record. When you enter a new customer in SME, you can enter the finance charge on the Account tab shown below.
You can also setup SME to enter a default finance charge for all customers you create. Then you can apply finance charges to invoices for the customer individually, or have SME apply finance charges to all overdue invoices in SME.
Set the Default Finance Charge
You can setup the default finance charge for customers. Whenever a new customer is created, the default late fee will be set for the new customer. You can always change the late fee on a customer by customer basis, but it's best to setup your standard or default late fee up front. To setup the default late fee follow these steps:
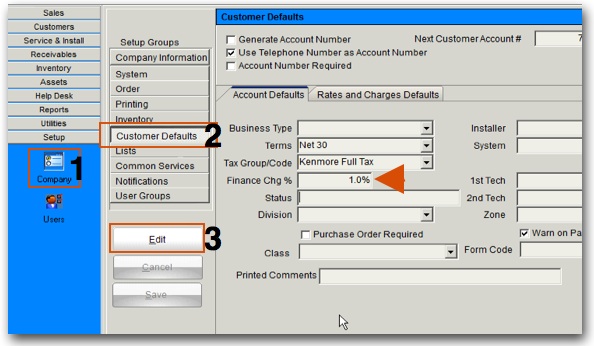
1. Go to Setup > Company ( 1 ).
2. Click Customer Defaults ( 2 ).
3. Click select Edit ( 3 ).
4. Locate the Finance Chg % field. Enter your finance charge in terms of yearly finance charge amount. For example, enter 12.0 if you want 12% finance charge per year or 1% per month.
5. Select Save.
Edit Customer Finance Charge %
When a new customer is created, the default Finance Chg % will apply. However, if you have an existing customer or want a special finance charge for a customer, you can change this on a customer by customer basis. Note that every customer site in SME can have a default late fee.
To edit the customer/site late fee:
- Go to the Customer or site.
- Click Edit.
- Click the Accounts Tab and enter the annual finance charge. For example, enter 12.0 if you want 12% finance charge per year or 1% per month.
- Click Save.
Apply Finance Charge on Individual Invoices
You can apply late fees to customer invoices. SME will determine if any late fees are due based upon the invoice due date. Late fee amounts are saved in the Late Fees tab to allow you to Deleted Selected late fees or clear all late fees.
- Go to the invoice you want to apply finance charges to.
- Click Actions > Calculate Finance Charges.
- SME will determine the amount of time beyond the due date and generate a late fee based on the Finance Charge % and amount of time. For example if the customer is 1 month late and Finance charge is 12.0 for a year which equates to 1% per month, then the late fee on a $1000 amount due would be $10.
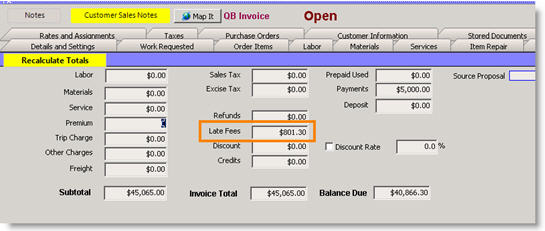
- The charge shows in the totals tab in the Late Fee field.
5.To remove the fee, go to the Late Fees tab, select an individual late fee, and click Delete Selected. You can also click Clear All to delete all late fees for this invoice.
Generate Finance Charges for ALL Overdue Invoices
SME allows the generation of late fees for all overdue invoices. SME will automatically determine the late fees for all invoices that are late based on the customer/site finance charge amount and the amount of time that the invoice is beyond its due date. It is recommended to be consistent when you run this utility, for example run it at the end or beginning of every month.
- Make sure that all customers have the proper finance charge % set. See the customer setup section above.
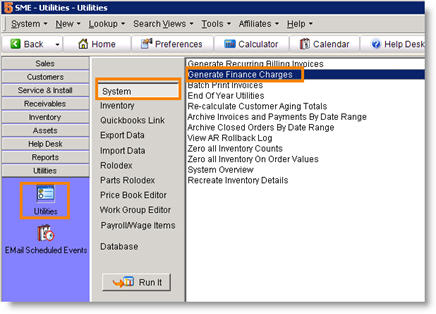
- Go to Utilities>System.
- Click Generate Finance Charges.
- Click Run It.
Apply Deposit To Invoice
If a customer has a deposit on account, you can apply the deposit to an invoice.
Enter a deposit for a customer
- Go to the customer.
- Click the Customer Activity tab.
- Click the Deposits tab.
- Click New and enter the deposit.
Apply deposit on an invoice
When generating an invoice from an order, if there is a deposit on account for customer, you will be prompted to apply the deposit to the invoice (image below). Enter the amount of the deposit you want to apply. If the full amount of the invoice is entered, the invoice will be closed.
If you click Cancel, the invoice will be generated as an open invoice. You can later apply the deposit to the invoice.
- Click Actions > Apply Deposit.
- In the Apply Prepayment window enter the amount of the deposit to apply to the invoice.
- Click OK.
Post Credit to Invoice in SME
If you are syncing SME with QuickBooks, you will want to enter your credits in QuickBooks. Click Credits Entered in QuickBooks to see how the QB Credit syncs to SME. If you aren't using QuickBooks, you can apply a credit to an invoice in SME and a credit memo is generated in the Receivables module.
- Go to the invoice you need to apply a credit to.
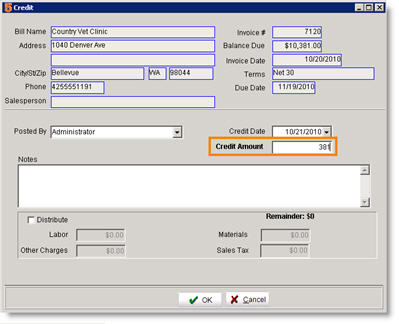
- Click Actions > Post Credit.
- In the Credit window, enter the Credit Amount and type notes if necessary. (image below)
- Click OK.
View the credit on the invoice:
- Select the Totals tab on the invoice.
- Locate the Credits field. The credit posted will be populated here. Notice the Balance Due field.
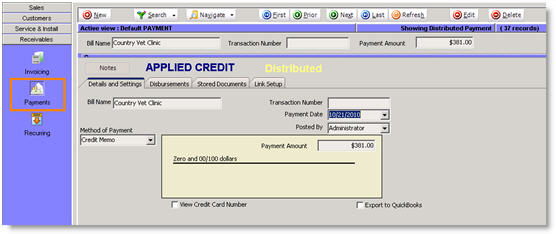
Review the credit memo in Payments:
- In the Invoice, select the Payments tab.
- Double click on the credit on the payment tab.
The Credit Memo will open in the Payments section of the Receivables module. (image below)
Credits Entered in QuickBooks
In QuickBooks you can enter a Credit Memo.
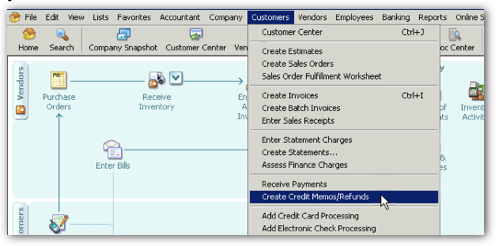
- Fill out the Credit Memo
- Click Save and Close.
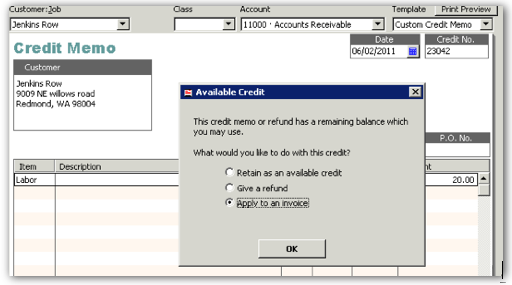
- In the Available Credit window, choose if you want to apply the credit to an invoice or retain as an available credit. Click OK.
Credit applied to an invoice
When SME and QuickBooks sync, the credit will be a Distributed Payment in SME.
You can find distributed payment by going to the invoice and select the Payments tab (image 1 below) or by going to Receivables module > Payments > Search Distributed (image 2 below)
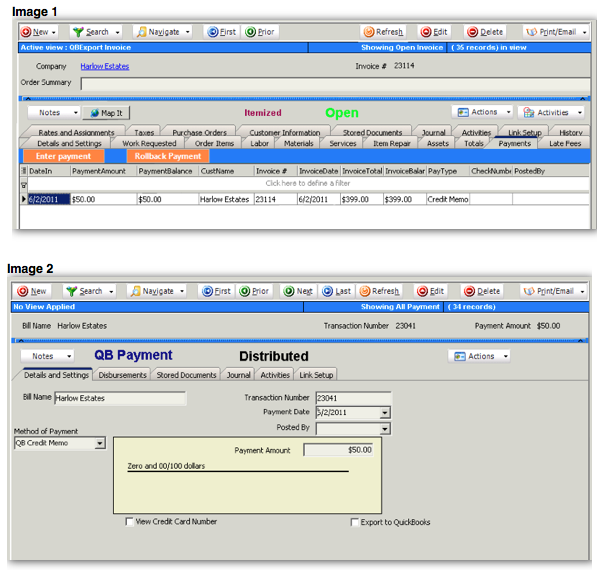
Credit Memo retained as an available credit
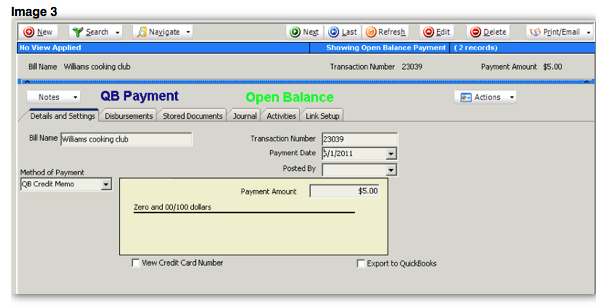
When SME and QuickBooks sync, the credit will be in SME as an Open Balance. To find the Open Balance, go to the Receivables module > Payments > Search Open Balances (shown in image 3 below).
NOTE: Applying the credit (open balance) to an invoice will have to be done in QuickBooks.
Statement
To email your customer a statement, click Actions > Statement.
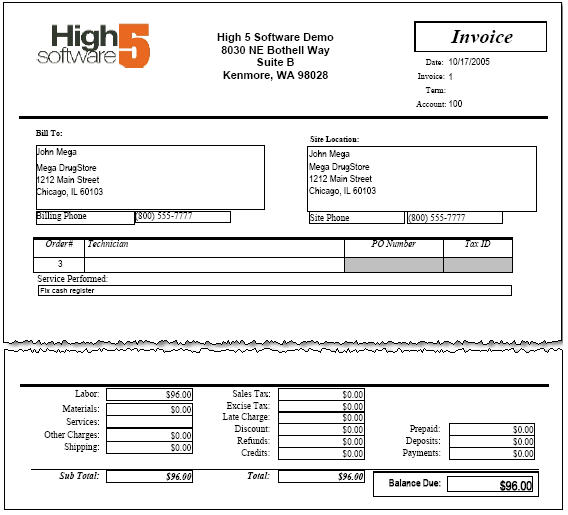
Your customer will receive an email from you with an invoice attached summarizing the balance due.
To change the report that is emailed:
- Go to Setup module > Company.
- Click Printing.
- Click AR Invoice in the For This Report list.
- Select the report you want to use in the Use This Template drop down field.
Past Due Notice
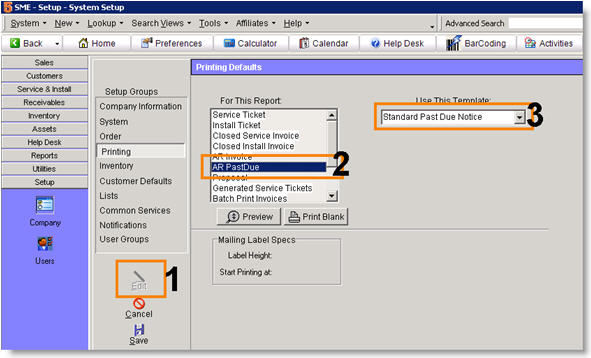
Click Actions > Past Due Notice to email your customer a past due notice for an overdue invoice. Before you do this, you need to setup your past due report in the Setup module.
Setup your Past Due Report
- Go to Setup module > Company.
- Click Printing.
- Click Edit. ( 1 )
- Select AR PastDue. ( 2 )
- In the Use This Template field, select the report template you want to be sent for the past due notice. ( 3 )
Notifications for Past Due Customers
For customers consistently late on payments or with a very large balance, you can setup a notification to notify SME Users when creating a new order that the customer is behind in the account. Click Notifications to read how to setup a notification on a customer record.
Update Customer and Billing Address
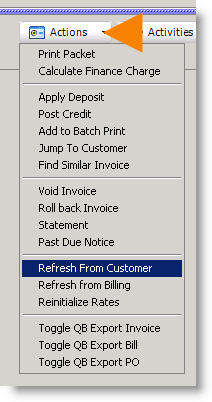
If you change the address on the site tab or billing tab for a customer record, the address on the invoice won’t automatically be updated. To update the customer address (site tab) on the invoice, Click Actions > Refresh From Customer. To update the billing address, click Actions > Refresh from Billing.
Change the Invoice Billing Address or Company
Change the billing company on an invoice
- Go to the Invoice.
- Click Actions > Roll back Invoice.
- Go to the order the invoice was generated from.
- On the Details and Settings tab, select the Billing tab.
- Click Change Billing Company.
- In the Searching for Billing Company window, double click on the new billing company.
- Click Save.
- Click Actions > Generate Invoice to regenerate the invoice with the correct billing company.
Change the company billing address on an invoice
To change the billing address on an invoice, you will need to roll back the invoice, change the billing address in the customer record, and then re-invoice the order.
- Go to the Invoice.
- Click Actions > Roll back Invoice.
- Go to the Customer and edit the billing address.
- Go to the order the invoice was generated from. Click Actions > Generate Invoice.
If you need to keep the original invoice number:
Take a screenshot of the invoice Details and Settings tab so you can reference the invoice number, invoice date, terms etc.
- In the invoice, Click Actions > Roll back Invoice.
- Go to the Customer and edit the billing address.
- Click Actions >New Combined Invoice.
- On the Invoice, Details and Settings tab locate the Invoice # field. Click
 to enter the invoice number. (If you don’t see this icon, you need to add the permission to initialize numbers to your user group settings)
5. Select the Service Orders or Install Orders tab to add the service or install orders to the invoice.
6. Click Save
Search Invoices
The search functionality is the same throughout SME. You can search invoices the same way you can search orders, customers and leads. You can choose which columns you are viewing in your search window, sort/group/filter by the data in each column, and export your data to excel. The different search views you setup can be saved for use later.
In Invoicing, you can click Search to search open invoices, closed invoices or all invoices.
Find all open invoices
- Go to Receivables module > Invoicing.
- Click Search > Search Open Invoices.
OR simply hit F5 on your keyboard to open the same search window showing all open invoices.
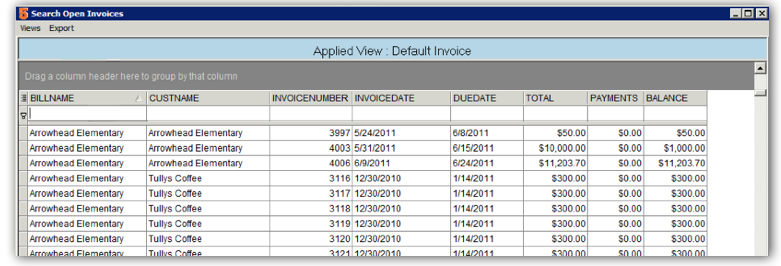
- Double click on the invoice you want to open.
- Click on the column headers to sort by the data in the column.
- Add columns to the search window
- Click Views > Add/Remove Fields.
- In the Grid Columns window, check the columns you want to add.
- Click OK.
- To save the new view, click Views > Save View.
Find all overdue invoices
To setup a search view that will show you all overdue invoices:
1. Go to Receivables module > Invoicing. Click Search > Search Open Invoices OR hit F5 on your keyboard to open the search open invoice window.
2. In the Search window, click Views > New View
3. In the Grid Columns window, check the following fields and any other fields you want to include.
- Billname
- CustName
- InvoiceNumber
- InvoiceDate
- DueDate
- Total
- Payments
- Balance
- LateFees
4. Click OK.
5. Rearrange the order of the columns by dragging and dropping the column headers where you want them.
6. Set the column width by clicking your mouse between the column headers and dragging them into position.
7. Click ![]() at the bottom of the search window to apply the filter on the due date.
at the bottom of the search window to apply the filter on the due date.
- Click Press the button to add a new condition.
- Click UID and select Due Date.
- Click Equals and select Is Past.
- Click OK.
8. To save the new view, click Views > Save View. Enter a name for your new view and click OK.
