Barcode for SME Reconciliation
When starting SME Reconcile, a window similar to below will be displayed.
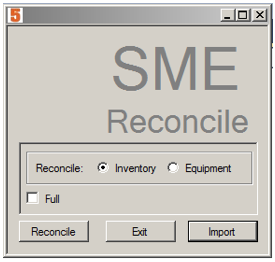
From this window there are two main tasks which can be accomplished. Inventory Reconcile and Equipment Reconcile. There is also in import button which allows the importing of an audit file created with the Barcode Device, but which was not sent to SME at the time of creation.
The 'Full' check box refers to a Full reconcile vs. only items matching those scanned (Item num and location); this option allows partial auditing techniques. For a Partial Audit only Items with a Last Reconciled date older than the date of the scan or for which a match is found, will be compared.
Note: for the purpose of this wiki only Non-Full reconcile will be shown.
Inventory Reconcile
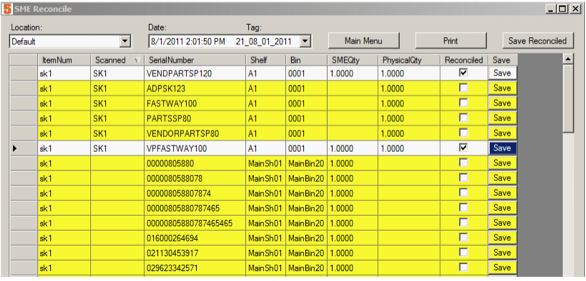
In the top left there is a location drop-down menu. This allows you to choose the location of the audit scan. Next to that is the Date of the scan, and the Tag pertaining to the scan. The Tag is made up of the Tech ID with the date. This allows the ability to do team audits where two more people use separate Barcode Devices and audit at the same time.
There are nine Column Headings:
ItemNum – This is the Item Number which matches the Barcode scanned. If there isn’t an item in SME which matches the barcode the cell will be blank.
Scanned – This is the actual barcode scanned, this will be blank for items which should have been scanned but weren’t.
SerialNumber – this is the S/N associated with that item, if the item is serialized.
Shelf – This is the shelf the item was found on, or should be found on.
Bin – Same as shelf
SMEQty – This is the quantity found in SME for the particular item e.g. Item Number, (S/N), location, Shelf, Bin. This Quantity can be adjusted.
PhysicalQty – This is the Quantity Scanned using the Barcode Device.
Reconcile – If the line item information scanned, matches the item information in SME this box will automatically be checked. Checking this box performs sets this item to perform the following functions BUT does not execute until the Save button on the same line is pressed or the Save Reconciled button at the top is pressed. If the item was not previously in SME it adds the item to SME It sets the Last Reconciled date for the item to the current system Time/date.
To print see Printing section.
Main Menu returns back to the Previous window.
Save Reconciled adds any items which were not found in SME and for which the Reconcile box was checked. It also sets the Last Reconciled date for ALL SME items to today’s date.
Equipment Reconcile
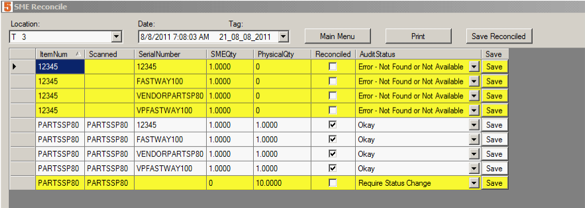
In the top left there is a location drop-down menu. This allows you to choose the location of the audit scan. Next to that is the Date of the scan, and the Tag pertaining to the scan. The Tag is made up of the Tech ID with the date. This allows the ability to do team audits where two more people use separate Barcode Devices and audit at the same time.
There are Eight Column Headings:
ItemNum – This is the Item Number which matches the Barcode scanned. If there isn’t an item in SME which matches the barcode the cell will be blank.
Scanned – This is the actual barcode scanned, this will be blank for items which should have been scanned but weren’t.
SerialNumber – this is the S/N associated with that item, if the item is serialized.
SMEQty – This is the quantity found in SME for the particular item e.g. Item Number, (S/N), location. This Quantity can be adjusted
PhysicalQty – This is the Quantity Scanned using the Barcode Device.
Reconcile – If the line item information scanned, matches the item information in SME this box will automatically be checked. Checking this box performs sets this item to perform the following functions BUT does not execute until the Save button on the same line is pressed or the Save Reconciled button at the top is pressed.
If the item was not previously in SME it adds the item to SME it sets the Last Reconciled date for the item to the current system Time/date.
AuditStatus – This is a visual indication of what the data reflects and what needs to happen.
- Okay means that what is in SME and what were scanned matches exactly.
- Require Status Change indicates that the item scanned was not found in SME (Or that the quantities do not match)
- Error – Not Found or Not Available indicates that an item in SME was not found during an Audit Scan.
- Save – Pressing save adds any items (Qty) which were not found in SME. It also sets the Last Reconciled date for ALL SME items to today’s date
To print see Printing section.
Main Menu returns back to the Previous window.
Save Reconciled adds any items which were not found in SME and for which the Reconcile box was checked. It also sets the Last Reconciled date for ALL SME items to today’s date.
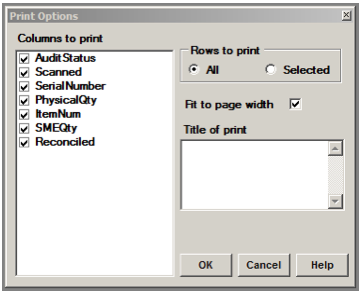
Pressing the Print button from either reconcile screen brings up the print options screen. This screen allows you to title the report, select what columns to print, and an option to fit the table to the page. Pressing ok brings up a Print Preview window.
Import
Import allows the importing of an audit file either directly from the device or any place on the computer or networked locations.
To import from the Barcode device, first turn of the Radio ( wifi)
- From the Home screen select Config
- Choose Wireless Companion
- Scroll to Disable Radio and press ENT (If the option is Enable Radio then it is already off)
- Do not forget to turn this back on after import is complete.
- Plug the Barcode device into the Computer using the supplied USB cable. (If a Windows Mobile Device screen appears choose Continue without setup). The device will now appear in any windows explorer window as if it were an external disk drive. (as Pictured below in the left hand panel)
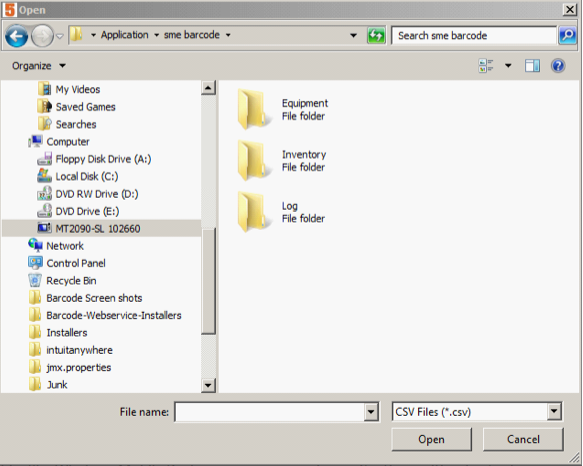
- Navigate inside the Device, open the Application folder, sme barcode. Here there will be two relevant folders Equipment and Inventory. Select according.
- Once inside choose the correct Audit File (Remember the file name is based on techID_date_ScanNumber)
- The values contained within will be imported into SME and can then be used to reconcile.
