Returns
RMA (Return Material Authorization) is used to return items either from a customer equipment list to your stock OR from your stock to the vendor. If parts need to move from customer to vendor, this requires two RMA transactions, one from customer to stock and another one from stock to vendor. SME does not always handle the accounting side of RMA's so you need to manage the credits to customer or from vendors.
Return Material from Customer Site back to Inventory
You can generate a return for bringing customer equipment that has been invoiced back into inventory. You can start a return from the Customer Equipment Module, directly in the return module, or by entering the invoice number the material was on.
Return from Customer Equipment
Customer Equipment that has been invoiced can be returned from your customer back to your inventory. You can check to see if the equipment was invoiced by opening the equipment and checking the Link Status.
1) Go to the Customer Equipment module and search for the customer
2) Right click on the equipment you want to return
3) Select Retire Remove / Retire
4) Click Yes to jump to new RMA
5) In the RMA, click the Return Items tab
6) Select the item on the grid and click Receive Item
7) In the Receive Return Items window, make sure Permanent Removal is checked, notice the warehouse you will receive the stock into.
If the material is serialized :
- Enter the serial number in the Receive Stock tab and click Add.
If non-serialized item:
- Enter the Received Quantity in the Receive Stock tab.
8) Click OK.
9) The RMA will close.
10) Go to the Customer Equipment and notice the status of the equipment you returned is now Retired.
11) Go to the inventory item and click the Material Details tab. If it was a serialized item you can locate the serial number and notice the serialized stock is now available in your warehouse.
Return from Returns module by Invoice Number
If you have the invoice number the material you are returning is on, you can enter the invoice number on the return and pull the material on the invoice onto the return.
1) Go to Inventory module > Returns
2) Click New > From Customer
3) Select the customer in window that opens
4) On the return, click Actions > Customer Return
5) In the window that opens, enter the invoice number
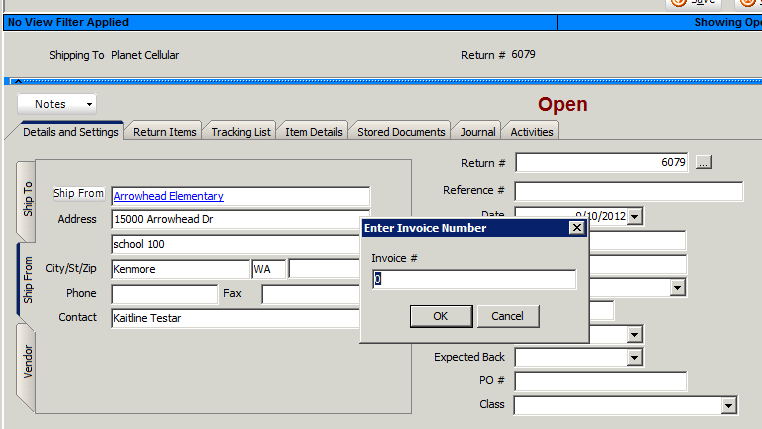
6) Click OK
7) The window that opens show the invoice. Double click on it to select
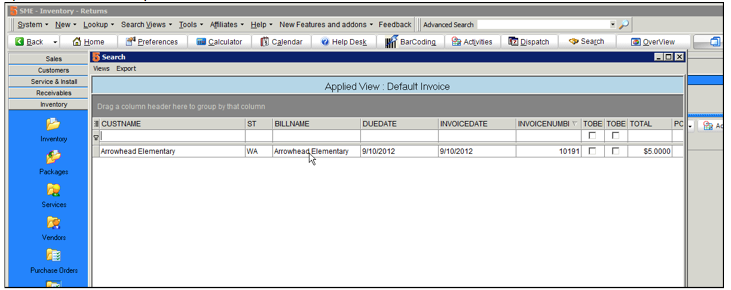
8) In the next window, select the material you want to return on that invoice and the material will be added to the return on the Return Items tab
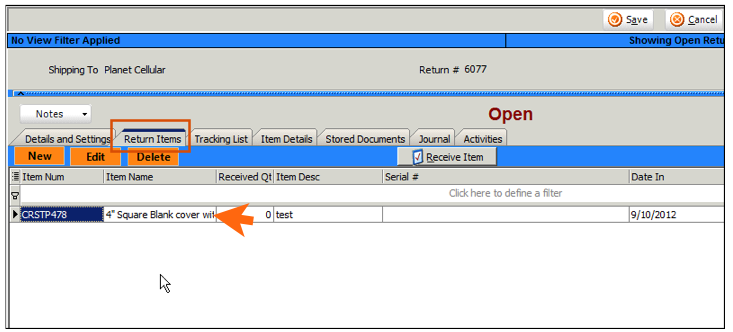
9) On the Return Items tab, select the material you want to return and click Receive Item on the tab.
10) Check Permanent Removal and notice the warehouse that the material will be returned into. Change as necessary.
If the material is serialized :
- Enter the serial number in the Receive Stock tab and click Add.
If non-serialized item:
- Enter the Received Quantity in the Receive Stock tab.
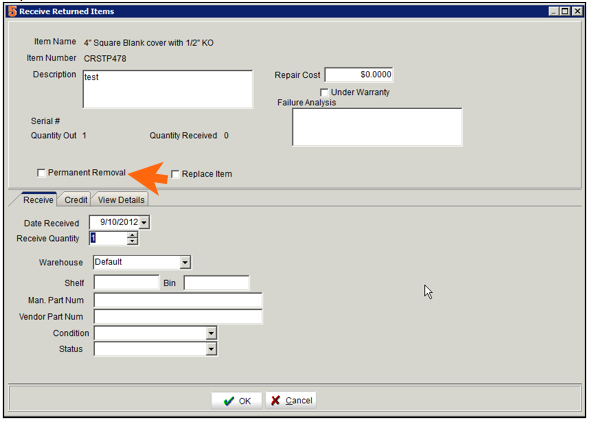
11) If you want to credit the invoice the material was on, click the Credit tab, otherwise click OK to complete the return.
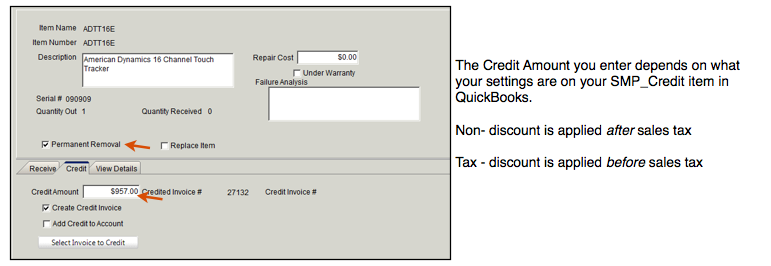
12) Enter the amount to be credited in the Credit Amount field.
13) Click OK. When all items are returned, you can click Yes to close the order in the window that opens
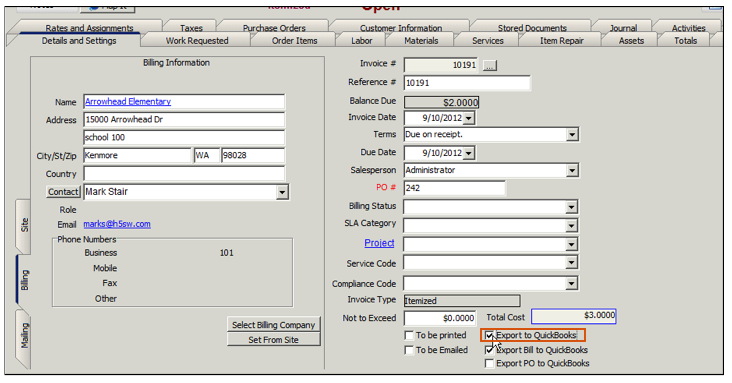
14) Go back to the invoice that was credited. If you want the invoice to update the invoice in QB, check Export to QB.
Return from Returns module search for material
You can initiate a return from the returns module by searching for equipment that has been invoiced for a customer
1) Go to the Inventory module > Returns
2) Click New > From Customer
3) Select the customer in window that opens
4) Click the Return Items tab
5) Click New on the tab
6) Click Select from Customer Equipment
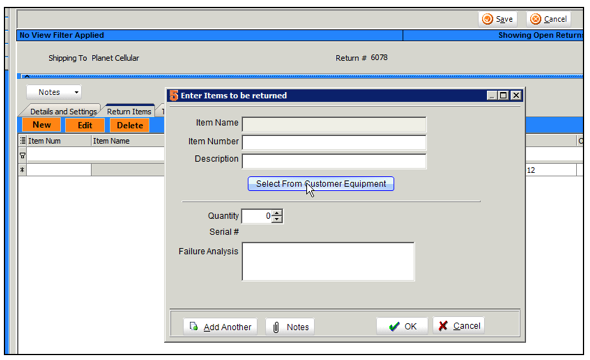
7) In the window that opens, select the equipment you want to return. The equipment must be invoiced to be able to return.
8) In the Enter Items to be returned window, click OK.
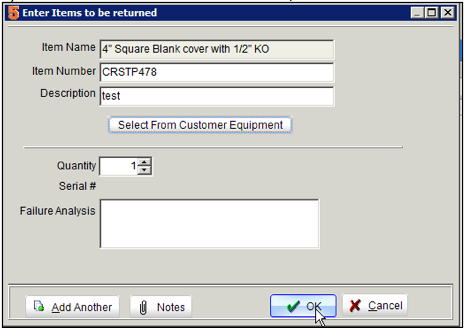
9) Click the the Return Items tab and the equipment selected will show on the tab.
10) Select the item and click Receive Item
11) In the Receive Return Item window, check Permanent Removal and make sure you are returning into the correct warehouse.
If the material is serialized :
- Enter the serial number in the Receive Stock tab and click Add.
If non-serialized item:
- Enter the Received Quantity in the Receive Stock tab.
12) Click OK.
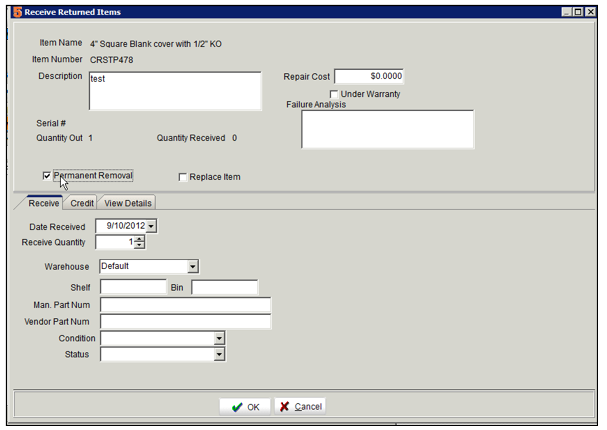
13) Click Yes in the prompt to close the return.
Create a credit invoice for customer equipment returned
1) Create a return from customer and put equipment on the return that has been invoiced.
2) On the return, click the Return Items tab
3) Select the item on the tab and click Return Item
4) Click the Credits tab. Enter the Credit Amount and check Create Credit Invoice.
5) Click OK and the return would close. You would then find a credit invoice that is set to sync over to QB on your next sync. You can find out what invoice number was created by going to the Item Details tab on the return and locating the Created Invoice row. Look in the Credit Invoice # column for the invoice # or double click to jump to the invoice.
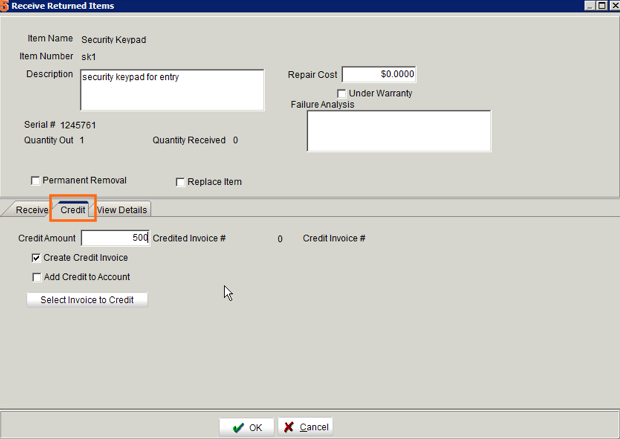
You can also start a return by choosing the invoice the equipment was on and crediting that same invoice.
1. Click New and select from Customer site
2. Select customer
3. clicking Actions > Customer Return
4. Select the invoice
5. Select the equipment to return
6. Go to the Return Items tab and you will find the equipment listed.
7. Select the equipment and click Receive Item
8. In the Receive Returned Items window, make sure Permanent removal is checked
9. Go to the Credits tab
10. Enter the credit amount. The Credited Invoice # will be populated
11. Go to the invoice number you credited to see the balance change. You can check Export to QuickBooks if you want it to sync.
Replace Customer Equipment
Returns allow you to return customer equipment and replace with other material in your warehouses.
Replacing serialized equipment with another serial number in stock in your warehouses
1) Go to Customer Equipment module and search for your customer
2) Right click on Equipment
3) Select Return Replace
4) Click Yes to jump to new RMA
5) In RMA, click the Return Items tab
6) Select the stock and click Receive Items
7) In the Receive Return Items window, notice Replace Item is checked. Click OK
8) In the Select Replacement Part window that opens, locate the part/ serial number you want to use as replacement.
9) You will be notified that the item has been reserved for the original order. Click OK.
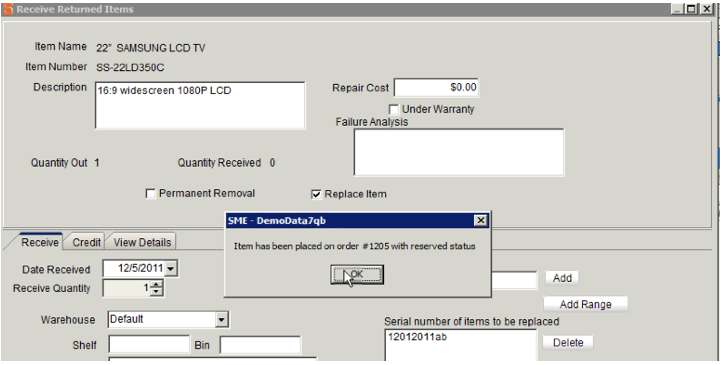
10) The RMA will close.
11) Go back to Customer Equipment and locate the item on the EQ list. Notice the item you brought back to stock has the equipment status of Retired and another line for the new serial number is entered with a status of Replacement.

Replace non-serialized equipment with another from your stock
1) Go to Customer Equipment module and search for your customer
2) Right click on the Equipment
3) Select Return Replace
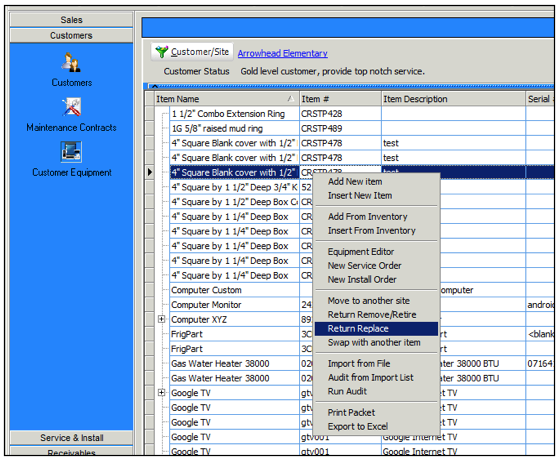
4) Click Yes to jump to the new RMA
5) On the return, click the Return Items tab
6) Select the equipment on the tab and click Receive Items

7) In the Receive Return Items window, notice Replace Item is checked. Click OK and that item will be returned to your warehouse.
8) The Select Replacement Part window opens. Select the stock you want to use as replacement.
9) A message will tell you all items have been received. Click Yes to close the return.
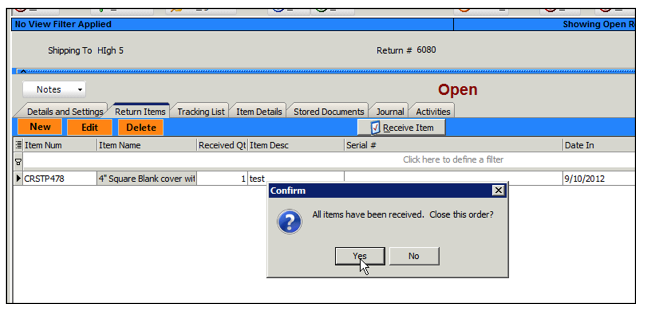
10) Go back to customer equipment module to see the original equipment with the status of Retired and the new equipment added as Replacement.

Return Material in Inventory back to the Vendor
1. In the Inventory module, select Returns.
2. Click New and select To Vendor.
3. Select the Vendor you are returning to in the Search window.
4. In the return, select the Return Items tab.
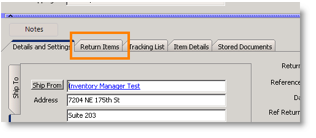
5. Click New.
6. Click Select From Stock in the Enter Items to be returned window.
7. Select the material you are returning in the Select Inventory Item window. If it is serialized, write down the serial number because you have to enter it later.
8. Make sure the quantity is correct and Click OK.
9. Click Save in the return.
10. Click Receive Item.
11. In the Receive Return Items window, check Permanent Removal.
- If serialized item: enter the serial number in the Receive Stock tab and click Add. Click OK.
- If non-serialized item, enter the Received Quantity in the Receive Stock tab. Click OK.
12. You will be prompted with “all items have been received, close return? Click the order?” Click Yes.
Returning serialized item from customer to vendor and swapping with a new serial number
Step 1: Return Serial Number from Customer Equipment back to your stock
Step 2: Return serial number from your stock to vendor
Step 3: Create PO to vendor to bring another serial number back to stock
Step 4: Create a service order to put the new serial number back at the customer site.
Step 1: Return Serial Number from Customer Equipment back to your stock
You can follow steps to return serialized equipment from customer stock as described previously on this page where you can see multiple options, or follow steps below.
1) Go to Customer Equipment
2) Right click on the Equipment
3) Select Return Remove/Retire
4) Click Yes to jump to new RMA
5) In RMA, click the Return Items tab
6) Select the item on the grid and click Receive Item
7) In the Receive Return Items window make sure Permanent Removal is checked and click OK.
8) The RMA will close.
9) Go to the Customer Equipment and notice the status of the equipment you returned is now Retired.
10) Go to the inventor item, click the Material Details tab. Locate the serial number and notice the serialized stock is now available in your warehouse.
Step 2: Return serial number from your stock to vendor
1) In RMA, click New > To Vendor.
2) Select the Vendor
3) Click the Return Items tab and click New on the tab.
4) In the Enter Items to be Returned window, click Select from Stock.
5) In the Select inventory item window, select the material you need to return.
6) In the next window that opens, select the serial number for the stock you need to return.
7) On the Return Items tab, select the stock on the grid and click Receive Items.
8) In the Receive Returned Items window, check Permanent Removal and click OK.
9) The RMA will close. The serialized material is out of your stock.
Step 3: Create PO to vendor to bring another serial number back to stock
1) Go to Inventory module > Purchase Orders.
2) Click New and select the vendor.
3) Click the PO Items tab and click New on the tab.
4) Click the I button and select the inventory item you need to bring into stock.

5) Make sure the Quantity and Cost are correct.
6) Click OK.
7) On the PO Items tab, select the material on the grid and click Receive Item.
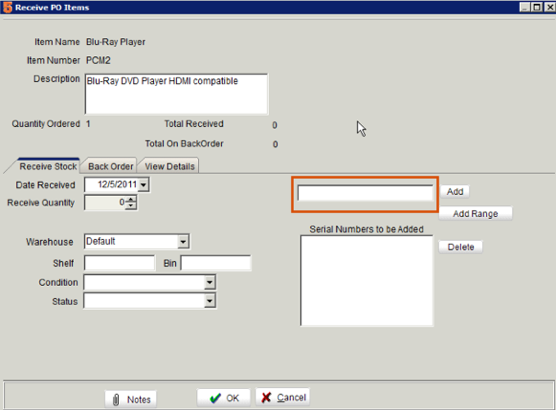
8) In the Receive PO Items window, enter the serial number in field circled below. Click Add to the right of the field and click OK.
9) The PO will close and the serialized stock is in your warehouse.
Step 4: Create a service order to put the new serial number back at the customer site.
1) Create a new service order for the customer that needs the new serial number.
2) On the Order Items tab, click New Material.
3) Select the material
4) In the Add Items to Order window, make sure the price is correct. Make sure Add to Customer Equipment is checked.
5) Click the Stock Details tab and click Select Stock.
6) Select the serial number you want to reserve.
7) Click OK in the Add Items to Order window.
8) Save the Service Order.
9) Click Actions > Close Order and Invoice the order. The serial number is taken out of your stock and you will see it on the customer’s equipment list.
Print the Return
1. Click Print/Email.
2. Select Standard Return Ticket by Ship From.
3. Click the printer icon in the print preview window to print the ticket.

